Pay Statement Ongoing Workflow
*Note: All urls mentioned in this document are samples and the actual url will be available once the client subscribes to the product.
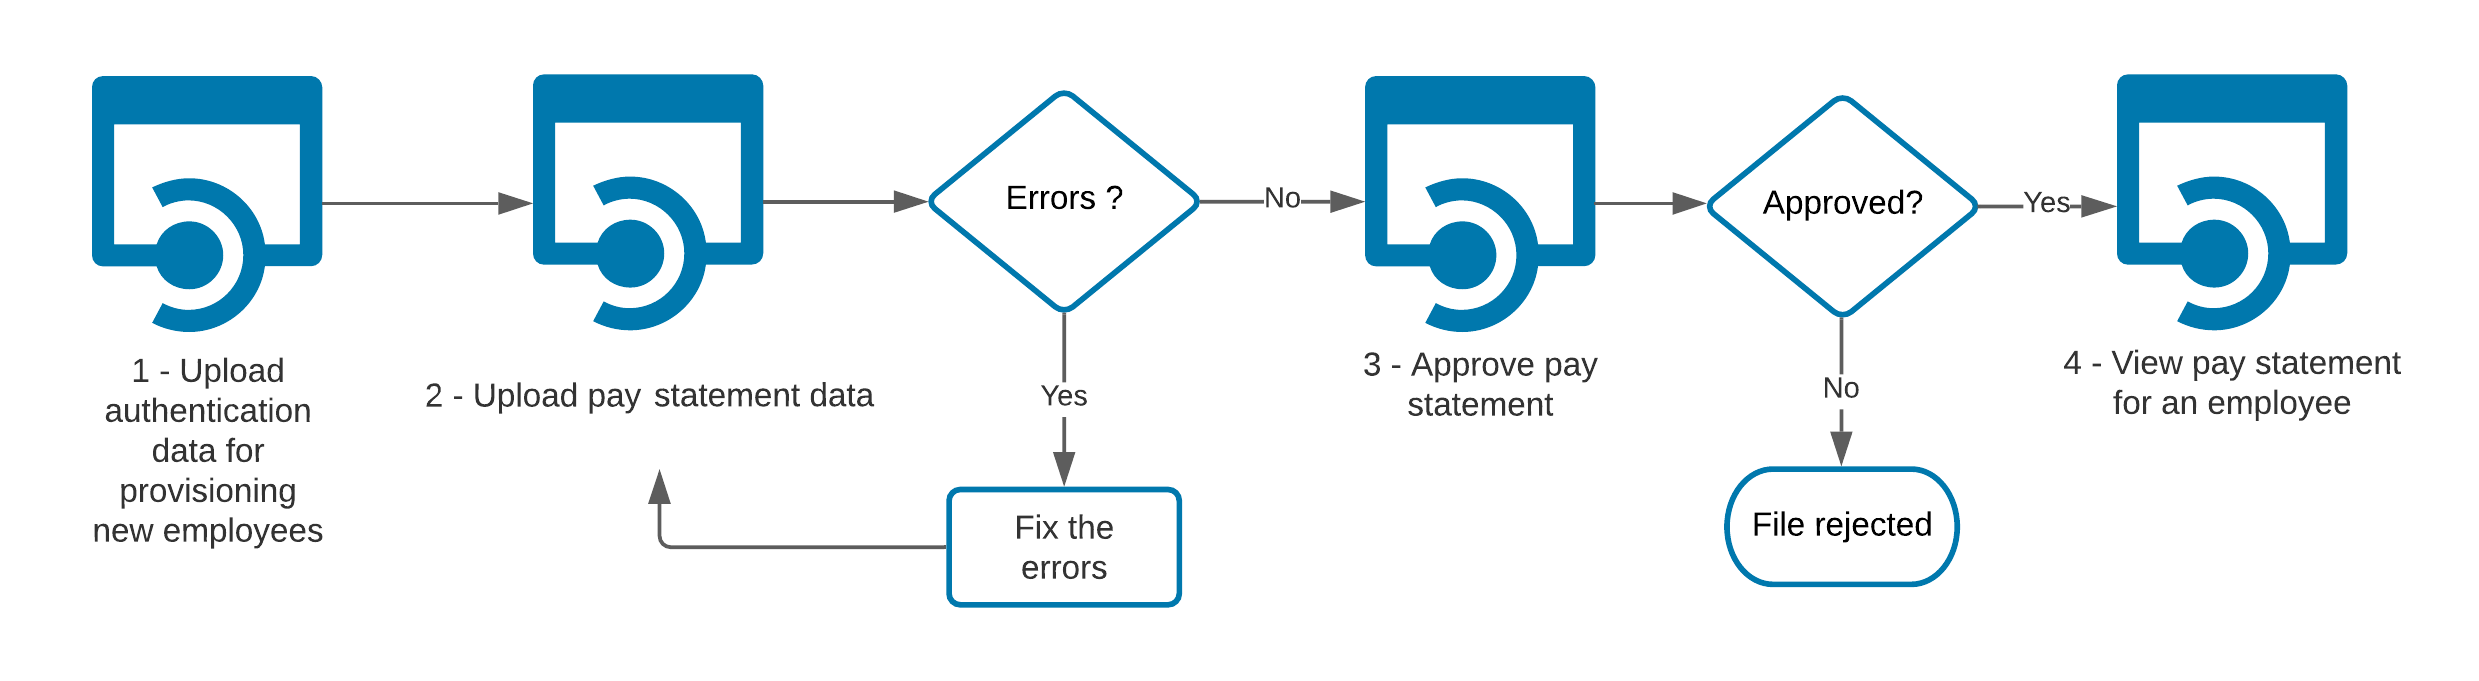
The ongoing workflow is what our clients will be using repetitively to upload and view pay statements.
Every CIC Plus endpoint will require two headers: authorization and a subscription key. The header information is as follows:
Headers
Content-Type: application/json
Ocp-Apim-Subscription-Key: {subscription key}
Authorization: bearer {token}
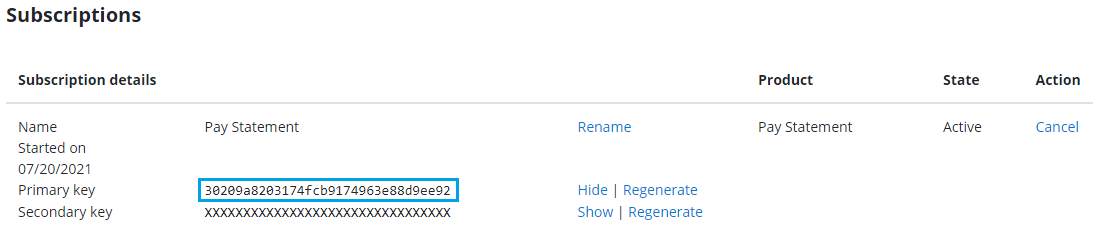
You can learn how to get an authorization token on this page. Subscription key can be found on the Profile page:
1. Upload Authentication Data for provisioning new employees
Pay statement data must be in XML format and contain the appropriate data fields. The XML format can be downloaded from the sample that you have selected, or have used as a starting point, by using the endpoint /paystatement/admin/samples/source-data
Below is the example GET request sent to the endpoint
GET https://developer.paperlessemployee.com/api/paystatement/admin/samples/source-dataThe response will contain the status code, and if successful, you can download the sample PDF file that CIC Plus offers. You may customize as per your needs.
200 OK
Content-Type: application/json
Response    : Returns the sample pay statement XML
2. Upload the Pay Statement Data
Submit your custom pay statement XML to the CIC Plus Pay Statement system.
Below is the example POST request sent to the /api/paystatement/admin/upload/source-data endpoint
POST https://developer.paperlessemployee.com/api/paystatement/admin/upload/source-dataThe request body will contain the following:
{
   "releaseDate": "string",
   "fileName": "string",
   "xml": "string",
   "templateName": "string"
}
The response will contain the status code. If your XML contains errors then appropriate error messages will be displayed. You may re-upload the pay statement XML after fixing those errors.
200 OK
Content-Type: application/json
Response    : Returns Upload Successful or list of errors
3. Approve / Reject Pay Statements
Approving or rejecting a Pay Statement file is a three step process:
GET request to view all the Pay Statement files uploaded and waiting for an approval.
GET request to view the specific file details
POST request to approve the selected file
or
POST request to reject the selected file
File ID is obtained from Step 1
Below are the examples for each step:
List of files awaiting approval:
GET https://developer.paperlessemployee.com/api/paystatement/admin/source-data/awaiting-approval{"Message": "Operation success","Data":[{"fileLogId": "3859b173-a3df-4439-bbf9-decb376ffbbb","fileName": "check_OPG-2.zip","processingOption": "Awaiting Client Approval","uploadDate": "2017-11-19T23:31:49"},{"fileLogId": "311051ac-ea4b-486d-90ab-f2256187eb02","fileName": "check_OPG-2.zip","processingOption": "Awaiting Client Approval","uploadDate": "2017-11-19T00:47:00"},...]}
File Details step:
GET https://developer.paperlessemployee.com/api/paystatement/admin/source-data/{fileId}/details200 OK
Response :
{
"fileLogId": "311051ac-ea4b-486d-90ab-f2256187eb02",
"fileName": "file20211112.zip",
"processingOption": "Awaiting Client Approval",
"uploadDate": "2017-11-19T00:47:00",
"fileTypeName": "CicPlus Pay Statement XML",
"companyName": "ABC Industries",
"cicUserUserName": null,
"description": "",
"size": 0,
"fileSource": null,
"xmlTotals": null
}
Approve/Reject steps:
POST https://developer.paperlessemployee.com/api/paystatement/admin/source-data/{fileId}/approvePOST https://developer.paperlessemployee.com/api/paystatement/admin/source-data/{fileId}/rejectThe response will contain the status code and a message.
200 OK
Response    : { "Message": "Operation success." }
4. View Pay Statements
Pay Statements can be viewed by employee id or by pay statement id by every admin. As an employee, you will be able to view only your paystatement by default. EmployeeId will not be required as a parameter.
As an admin you can view the most recent pay statement for an employee by using the /paystatement/employee/most-recent endpoint and passing in the employee id.
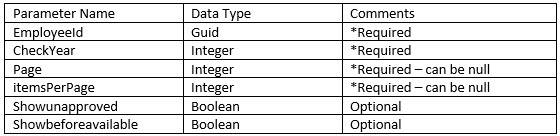
To view other pay statements, you must view them using the pay statement id. You can get the pay statement id from the list of pay statements for an employee for a given year using the endpoint /paystatement/all-for-year. The parameters needed for this endpoint are as follows:
With the id, then call the endpoint /paystatement/{paystatementid}.
Below is the example GET requests sent to the endpoints to view the pay statements
GET https://developer.paperlessemployee.com/api/paystatement/employee/most-recent/employee-id?6c849aa8-b7ab-4c3d-8c05-20270ccb699cGET https://developer.paperlessemployee.com/api/paystatement/all-for-year/employee-id?6c849aa8-b7ab-4c3d-8c05-20270ccb699c&checkYear&year_for_which_we_need_history&showunapproved?true_or_false&showbeforeavailable?true_or_falseGET https://developer.paperlessemployee.com/api/paystatement/paystatementid?8e849aa8-b7ab-4c3d-8c05-20270crb699c5. View Pay Statement Details
An admin can view employee pay statement with additional details, such as GrossPay and NetPay, Taxes and Deductions, Vacation and Sick Balances.
Below is an example of the GET request
GET https://developer.paperlessemployee.com/api/paystatement/admin/all-for-year/employee-id/details/employee-id?6c849aa8-b7ab-4c3d-8c05-20270ccb699c&checkYear&year_for_which_we_need_history&showunapproved?true_or_false&showbeforeavailable?true_or_falseThe response will be as following:
{
    "payStatementId": "00000000-0000-0000-0000-000000000000",
    "fileLogId": "00000000-0000-0000-0000-000000000000",
    "companyUserId": "00000000-0000-0000-0000-000000000000",
    "outputVersionId": "00000000-0000-0000-0000-000000000000",
    "companyId": "00000000-0000-0000-0000-000000000000",
    "xmlData": "<G_EMP_DATA><RUN_ID>17574554</RUN_ID>...</G_EMP_DATA>",
    "checkDate": "2022-08-18T11:59:18.8298668-05:00",
    "voidTimestamp": "2022-08-18T11:59:18.829867-05:00",
    "checkNumber": "1999",
    "grossPay": "100.00",
    "netPay": "90.00",
    "taxes": "5.00",
    "deductions": "5.00",
    "vacationBalance": "8",
    "sickBalance": "8",
    "periodBegin": "8/4/2022 11:59:18 AM",
    "periodEnd": "8/18/2022 11:59:18 AM",
    "void": true
}